Friday, April 29, 2016

Make Your Own Slime, Goo, Putty

A while back I bought my oldest son some slime.  He liked to use it when he was playing with his Batman and Joker toys and the Joker Laff Factory by Fisher-Price.  He put the slime in the pool, and either Batman or the Joker would end up in it.

Well, this slime was very slimy.  It ended up all over his clothes, and his floor, and his dresser.  It got dirty, and eventually it got dried up.

And he was slimeless.

I could not find any more of that slime where I bought it so I turned to my old pal Pinterest and found some DIY slime!

I made two batches.  The first I used white glue, and made it WITH my son.  Because it was for him.

The second one I made to take pictures of the process.  I used clear glue for mine.

SUPPLIES


1 tsp of Borax
1 and 1/2 cups water
4 oz bottle of glue
food coloring (optional)
glitter (optional)
2 bowls and spoons for mixing (can also use craft sticks to stir)

DIRECTIONS


1.  Take your bottle of glue and DUMP all of it into one of your mixing bowls.


2.  Fill your glue bottle with 4 ozs of water.  Close it up, give it a good shake, then dump that into the bowl with your glue.  Mix Well.

(OPTIONAL STEP: If you want colored goo, add a few drops of color to your glue mixture and mix well.  If you want sparkle goo, this is also where you would add the glitter.  Remember, food coloring might stain skin or clothing.)


3.  Pour a cup of water (8oz) into your second bowl.  Add 1 tsp of borax.  Stir until the borax has completely dissolved into the water.


4.  SLOWLY pour the Borax mixture into the glue mixture.  You should notice an IMMEDIATE reaction as the glue mixture turns clumpy and slimy.  Stir until it wont stir, then get your hands in it and knead it!


Continue to knead your Goo until it is a stretchy putty consistency.  This can take several minutes.  If you think its never going to come together, just be patient and keep squishing and kneading.

Now you have hours of slime filled fun in the palm of your hands!

The one on the right I made.  The one on the left I made with my son.

When not playing with your goo it should be kept in an air tight container.  If it starts to dry out, add a few drops of water and knead again.

OR....just make some more!

OTHER THINGS TO TRY

  • Try different glues.  White glue makes an opaque slime.  Clear glue makes a transparent slime.
  • If you don't want to add food coloring and/or glitter, then you can try using Elmer's Glitter Glue as the glue base:
    Available at Amazon
  • Add different things to the slime!  You can put alphabet beads in it, or plain beads, or any kind of small toys.  Just make sure your additives don't dissolve when wet.
  • Having a party?  Whip up a batch of slime for party favors.  Princess party?  Make pink slime.  Frozen party?  Make blue goo!  Paw Patrol?  Color glue to match each of the pups!

DISCLAIMER 

I made the pink slime using white glue and no glitter, and it turned out perfectly.

I made the blue slime using clear glue and glitter, and it did not turn out the same.

The pink glitter flows, and is stretchy.  It can be squeezed and mushed.  The blue one cracks and crumbles when you squeeze it and tears instead of stretching.  But the parts always melt back together when you leave it sitting for a while.

I'm not sure if I accidentally added too much or too little of something.  I guess we'll find out next time we make some.

Wednesday, April 27, 2016

WIP Wednesday #4

HAPPY WEDNESDAY!

How are all my fun creative friends this week?
Have you started a new project?
Have you finished an old project?

This week I did not do much that is crafty.  I have a   I didn't even have a completed craft to share, so I ended up doing a curated list of Earth Day Crafts.

My biggest WIP will be shared on my None Says blog... so don't forget to click the linky below to see what has took the most of my time this week.

But, I did buy something though.  Do you know what can be made using these two items:


It is going to be fun, and kids are going to LOVE it.

So, what have you been working on this week?

Don't worry if your WIP isn't actually "crafty" in the technical sense.  As you can tell from the WIP I'm sharing below from Noner Says, there are lots of kinds of WIPs that you can share.

Now, don't be shy, come share what you're working on. All kinds of art and crafts are welcome to share their progress.

Also, feel free to snag our new WIP Wednesday Button and link it up!


<a href="http://adiyday.blogspot.com/search/label/WIP%20Wednesday"><img src="http://i67.tinypic.com/2mn59v4.jpg" /></a>


Thursday, April 21, 2016

A DIY Day Earth Day Celebration


Today (April 22) is Earth Day!

I wasn't able to complete a craft this week, but I have compiled a list of cute crafts and activities to help you celebrate Earth Day in true DIY style!

After all, every DIY Day is Earth Day.


1.  Make leaf prints in Air Dry clay.  Crayola Model Magic is super soft to work with, and dries quickly!  OR you can make your own salt dough for impressions.

Other green crafts can been found in The Garden Classroom.

Despite the "Garden" in the title, this book is not all about planting and growing seeds.  Its a learning book that also incorporates reading and writing, arts and crafts, math skills and how you can use the great outdoors to stimulate imagination and play.

2.  Use old newspapers and magazines to make upcycled garbage art!  You can make fun collages from magazine pictures, or something even more fun like making a paper mache earth from newspaper strips and a balloon.


3.  Recycle or upcycle even more items to make something new.  Like this Sun-catcher made from an empty soda bottle!


4. Make a recycled bird feeder.  There are so many ways to do this!


5.  Ellen from daily heART doesn't have a tutorial, but you can use this twig heart for earthy craft inspiration.  (Just make sure to use fallen twigs and not break them off the trees!)


6.  Create a Game!  Use milk jugs and newspaper to create a toss and catch game!

7.  Make a Bookmark using pressed leaves and flowers with recycled cardboard.

8.  Give someone a Plantable Recycled Paper Seed Card.

9.  Have a Lorax party. 


10.  PLANT A TREE.  One of the most earth friendly things you can do for Earth Day is to help the earth keep breathing by planting a tree.  Or you can get a free pack of seeds and help FeedABee and take a step towards saving the worlds declining bee population.

There's just a few quick ideas to get you started this Earth Day.

If those inspired you and you want to see even more, Follow my Earth Day board on Pinterest!

Tuesday, April 19, 2016

WIP Wednesday #3

Sadly it has not been a very crafty week for me.  I've spent most of my time on youtube watching soap making videos.

I think I would like to make some cold process soaps.  But I don't have what I need to get started, or the money to buy what I need to get started.  So I'm a no-go with that just like I am with melt and pour soaps.

I did check a cold process book out of the library though.


I'll have to review it as a non-soap maker when I finish it.

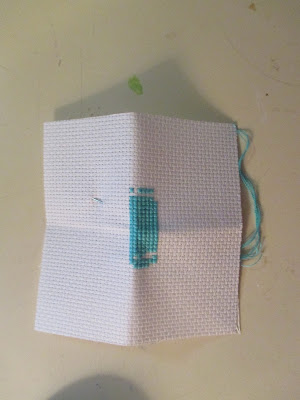
I did do a little work on the small counted Cross Stitch I shared on the first WIP Wednesday.  It feels good to be stitching again.

Who can tell what it is yet?

Now, don't be shy, come share what you're working on. All kinds of art and crafts are welcome to share their progress.

Also, feel free to snag our new WIP Wednesday Button and link it up!


<a href="http://adiyday.blogspot.com/search/label/WIP%20Wednesday"><img src="http://i67.tinypic.com/2mn59v4.jpg" /></a>


Wednesday, April 13, 2016

WIP Wednesday #2

Good morning Creators!

I hope your past week was a productive one!

Did you finish any projects?  Did you start any new ones?

I finished my Creeper Canvas this week, but nothing else.

I did start a new creation though.  GALAXY SOAP!


A photo posted by Nona (@nonersays) on

Now, don't be shy, come share what you're working on. All kinds of art and crafts are welcome to share their progress.

Also, feel free to snag our new WIP Wednesday Button and link it up!


<a href="http://adiyday.blogspot.com/search/label/WIP%20Wednesday"><img src="http://i67.tinypic.com/2mn59v4.jpg" /></a>

Monday, April 11, 2016

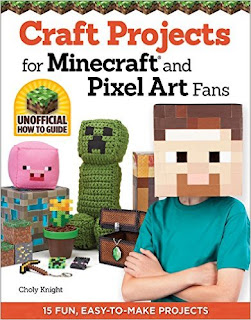
Craft Projects for Minecraft and Pixel Art Fans

Our household is full of boys who are obsessed with all things Minecraft.  I am obsessed with all things craft.  So when I found Craft Projects for Minecraft and Pixel Art Fans I knew I had to have it, and I had to make my boys some things out of it.

Craft Projects for Minecraft and Pixel Art Fans
This is an unofficial guide, which means it was not released by the same people who created the massive pixelized sandbox game that is Minecraft.

This book of Minecraft craft projects comes from Choly Knight, who is no stranger to crafty project books.  (Check out her page at www.cholyknight.com)

The beginning of this book tells you a little about how our world is full of pixel art and design that we may not even be aware of.

That is followed by 10 pages of pictures of other peoples Minecraft inspired projects.  Everything from food, to party decor, to entire bedrooms.

Then she goes on to tell you a little about the Minecraft game and the popular and fun creatures that inhabit it.

Each of her crafts come with a 5 level difficulty rating, based on minerals from the game. Grass is the easiest level, and the black one whose name I can't remember is the Max difficulty.

The next section goes over the supplies you will need to complete the projects in this book.  I like that she includes helpful tips for people who might not be familiar making crafts with things like perler beads and duct tape.

The projects themselves range from simple pixel art paintings, to perler bead key chains.  She even gives you a project to do with the empty rolls you have left over after completing your duct tape Minecraft projects.  And we all know how much we like recycled projects here at A DIY Day.

Most of the projects are simple enough for Minecraft fans to do themselves.  It might encourage them to get off of the game for a little while and get crafty.  Besides, they would still technically be playing minecraft.  

Projects I Made From This Book

Minecraft Creeper Canvas

Friday, April 8, 2016

Minecraft Creeper Canvas

My husband and my sons have become rabid fans of the game Minecraft.  Even my 2 year old gets excited when my husband turns the Xbox on and he can't even SAY Minecraft.  (Mini Mini! is what he calls it.)

Both of my sons are in love with one particular enemy in the game.  A green fellow called a Creeper.  To me the Creeper looks a bit like a walking cactus, and it has a nasty habit of, well, creeping up on you and blowing holes in things.

My oldest son even has a stuffed Creeper toy that he sleeps with every single night.

So when I first saw the Minecraft Creeper face Pixel art pop up on my Pinterest page I just KNEW my son would love to have it for his bedroom wall.  Then I found a book called Craft Projects for Minecraft, and it had a pixel pattern in the back that I could use!  So I created one.

Minecraft Creeper Face Pixel Art


The entire world of Minecraft is pixelated.  Very different from most of todays hyper-realistic video games.  But much easier to create art out of.

To make this Minecraft Creeper canvas you basically just have to be able to draw and color in a bunch of squares.

SUPPLIES


12x12 canvas (use larger or smaller square if desired, but should be square)
4 shades of green paint (or 1 if you don't want a pixel art creeper)
Black Paint
Ruler, Pencil, Paintbrush
Painters Tape (optional)
A copy of Craft Projects for Minecraft and Pixel Art Fans for Minecraft Creeper face template (and other fun Minecraft projects)


HOW TO


Take your canvas, ruler and pencil and begin to mark off squares to form an 8x8 grid.  If you use a 12x12 canvas like I did, then each of your squares should be 1.5 inches.  Make your marks lightly.

Remember to mark lines lightly so they can be easily erased later
or hidden under a layer of paint.

I marked off 1.5 inch marks along the top and the bottom, then I took my ruler and traced a light line between the two marks.

Repeat the process along the right and left sides.

Your canvas should look like this:


You should create an 8x8 grid on your square canvas of choice.

To make it easier on myself I use the template in the back of Craft Projects for Minecraft and made my grid into a paint by number, coordinating my paints with number marked on the grid.

I numbered mine 1 through 4 for my shades of green,
with B to indicate black for the Creeper's face.
If you prefer you can use one shade of green, and color all the squares except the face squares one solid green.  I wanted the full pixel effect.

Now, if you want very crisp clear lines you need to take it a step farther and block off your squares using painters tape.  That would take more time and effort than I wanted to put in this project however, so I just free-handed it using a smallish paintbrush.

h


 Once it was all done I hung in on my son's bedroom wall to surprise him when he got home from school.

He didn't like it as much as the Minecraft Poster his dad had gotten him recently, but he did say he didn't want me to put it in his brothers room instead.


TIPS


*  Keep your pencil marks light, so they are hidden under the paint.  They cannot be erased once painted over.
*  If you use the paint by number method like I did, then it is easier if you work one color at a time.
*  Let each color dry before applying a second coat (if needed.)
*  When panting, let one square dry completely before painting a neighboring square, to keep your pixels from blending together.

Wednesday, April 6, 2016

WIP Wednesday #1

Welcome to the very FIRST WIP Wednesday on A DIY Day! In this weekly post I am going to show different thing I'm am working on, as well as sneak peaks of projects that might be a featured DIY tutorial here on the blog.

I also want to give you a place to share your own Works In Progress too!

I hope you'll join in on the Linky fun, share your own WIPs and share this Link Up with your crafty friends too!

Here are a few of the projects I'm making Progress on this week!

Pixel Wall Art
My son knows what this piece of pixelized wall is destined to be. Can you tell?

Painted Dinosaur Toy
However, nobody in the house is quite sure why I'm adding multiple coats of white paint to this dinosaur toy. 
 
cross stitch in progress
And this is a tiny cross stitch that I just recently pulled back out of the drawer with the intention of finishing.  What do you think the finished picture is going to be?